I have a thing for old Seikos with faceted glass. I prefer projects with new old stock glass that I can track down but I am quick to justify adding to my collection in less than perfect circumstances. This red dialed 1967 Seiko Actus SS 6106-7690 is an example of such a scenario.


As always, this thing is filthy and my cheap ultrasonic cleaner, although very helpful, will still leave me picking some crust out the bracelet links and pins. It’s funny because I enjoy the mechanics of the watch movements themselves but I probably spend the majority of my time on these projects trying to clean the case up. I could probably speed it along with some abrasives but my preference is for unpolished watch cases so it takes a lot of soaking in soapy water to take the more gentle approach.


Removing the delicate pieces and the automatic winding mechanism before I give it a full wind with a screwdriver.

Fully wound on the timegrapher is a promising preview of what is to come. The amplitude is low but things look pretty good all things considered.


Here is everything disassembled and ready to clean. Since I have a lot of time on my hands these days due to local covid-19 restrictions I decided to hand clean the parts instead of using my ultrasonic cleaner… which certainly occupied some time.


Reassembling the train of wheels


Now with the train of wheels together and spinning freely it is time to install the pallet fork so that I can wind the mainspring up.

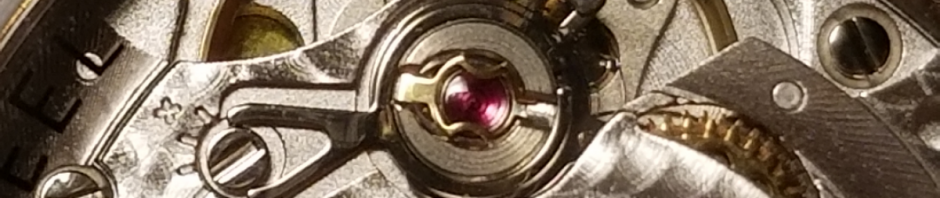
Oh no! The jewel on the pallet bridge fell out while I was rubbing it with some rodico for a last minute touch up. Better I have this problem now than after the watch is fully assembled.

Time to get out my trusty old JKA-Feintaster precision gauge from the closet to measure the jewel diameter so that I can select the right size pusher for re-installation.


Of course, I also had to dig out the Seitz jeweling tool from the closet in order to press the jewel back into its hole. I found it a bit fiddly trying to keep the jewel centered, holding the bridge, and adjusting the pusher depth. I used a piece of rodico to help hold the bridge so that I could focus on getting the jewel started and secured into the hole.

Now that it is just barely set into the hole and I have the depth adjusted on the jeweling tool I’m ready to remove the rodico so I can get the jewel pressed in to its final depth nice and even.

Here is the final press and the result. Now I can resume cleaning this part and get it installed.


Time to fit the balance wheel and test how it runs.


The initial test looks pretty good. I’ll let this run down and rewind before continuing.

Now to assemble the keyless works and dial side complications.


Since I’ve got the cosmetic bits in place, I’ll case the movement before installing the autowinding assembly.


And finally I replace the gasket and put the caseback and bracelet back on. Lucky for me, the bracelet was a pretty close fit and the fine adjustment on the clasp was all I needed. Although, I wasn’t able to find a replacement faceted crystal for this watch I am still happy with how it turned out.


Thanks for watching!
-Watch Dog
 Site Feed